Mistress Yseult de Lacy (Chris Robertson)
Mistress Yseult de Lacy (Chris Robertson)
March 2004
Not very long after mankind first began to herd sheep, he discovered that wool strands can be twisted together to make a thread. The scales on the surface of wool fibres encourage them to cling together, and once these bonds are set by heat and/or pressure they are both strong and stable. Until then, however, the resulting thread will happily unwind itself without much provocation, making it difficult to produce any reasonable length of thread before it unravels. The simplest answer to this problem is to wind the thread onto something like a nice smooth stick as it is twisted, and thus was born the spindle. (Winding the growing thread into a ball would also work, but would be much more difficult to manage and does not seem to have been done.) The tension of winding onto the spindle and the pressure of overlying thread in the wound mass set the bonds within the twisted fibres sufficiently to significantly discourage untwisting once the thread has been unwound, even before the twist has been permanently set (typically by soaking in very hot water or weaving the thread under tension).
By itself, a spindle is still of limited use, as the thread must be twisted by hand little by little and continuously wound up, which is fiddly and time-consuming (although some spinning is still done this way even today, with the thread rolled against the thigh to twist it). The second innovation, which made a world (pun intended) of difference, was the spindle whorl, which seems to have appeared very soon after the spindle itself. The whorl is a solid disk or spheroid (bead) made of lead, stone, clay, pottery, or wood, with a central hole through which the spindle is fitted tightly. The whorl may be set at the lower or upper end of the spindle; in modern usage, it seems to be about half-and-half, but medieval usage seems to be predominantly at the lower end. In either case, a few centimeters of spindle projects below or above the whorl, respectively. Modern spinning technique wraps the thread around this projection to tension it (see Figure 5); I have found no evidence as yet to suggest this was done in period.
What the whorl does is provide angular momentum in the spinning process. Rather than simply twirling the fibres between the thumb and fingers, the rotation of the vertically-hanging weighted spindle now twists the fibres attached to it into a thread. This is more efficient than a simple finger-twist, since gravity provides the tension needed to keep the twist occurring, freeing both hands to control the operation of draftingdrawing out the fibres from the wool mass so they can be twisted. It is still necessary to wind the thread onto the spindle by hand, but as a longer thread can be spun in one go this also becomes more efficient, further aided by the weight of the whorl in speeding the horizontal rotation of the spindle when winding-on.
The final refinement was a notch in the spindle near the top to provide a secure anchorage for the thread (in modern spindles, this is often replaced by a little cup hook screwed vertically into the top of the spindle) . The notch is not essential, as thread knotted in a half-hitch round the spindle near the top will stay more-or-less in place under tension. It does, however, lessen the frequency of the thread slipping off and the spindle falling to the ground. As yet I have no idea when notches were first introduced; I have not found any illustration of one, and they may well not be period.
"Drop spindle"the name is obvious. The spinning spindle drops, gravity provides tension, wool is drawn down, the thread extends. But why "rock?" Munro [2003] says that some early "spindles" were, in fact, simply rocks onto which the thread was first tied and then wound. And many early spindle whorls are indeed made of beautifully carved and decorated stonerock! So it appears that the concept of "rock" was sufficiently associated with spindles to pass the phrase into the language as "spinning on the rock" for drop spindle work.
In modern times, the word "spinning" is almost always associated with "wheel." And the Great Wheel certainly existed in the Middle Agesit is pictured in the Lutterel Psalter c. 1330 (Figure 1), and was certainly known by 1224 [Munro 2003]. It was also banned from use for spinning at least warp threads for commercial use for quite some timefrom the thirteenth to fifteenth centuries, depending on country. Why was this? Well, the Great Wheel produced thread inferior in strength and evenness to rock-spun thread. The spinner at the Great Wheel had to use one hand to spin it, while holding a distaff (stick about the length and thickness of a broomstick with a wool mass bound onto the top end) under the other arm or a wool mass in the other hand, which meant she had far less control of the drafting process and thus the thickness of the thread so produced. By contrast, while the rock spinner typically also had a distaff tucked under her left arm or a wool mass held in her left hand, she was still able to use the fingers of both left and right hands for drafting, providing much finer control.
Until well into the 1500s most spinning, whether of wool, flax, hemp, or ramie (stinging nettle fibres), domestic or commercial, was done on the rock. Cotton fibre, known in southern Europe from the 13th century or so, may well have been rock-spun there, but was only common in northern Europe sufficiently late for it to have been mostly spun on the wheel. The other major period fibre, silk, is wound and reeled from the silk-moth cocoons rather than being spun, and seems never to have been domestically-produced in Europe. Indeed, machinery to assist in the process of reeling (throwing) silk was invented and utilised surprisingly early (1300s or so).
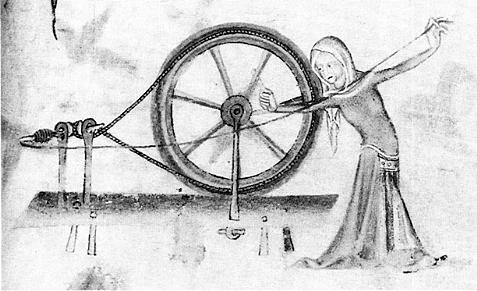
Figure 1. Spinning on the Great Wheel, c. 1330T
The modern spinning wheel was not invented until the late 1400s, when it was known as the Saxony Wheel. Winding the wool onto the spindle is done automatically on the Saxony Wheel, whereas when using the Great Wheel this still had to be done by hand at frequent intervals. The Saxony Wheel itself is also turned by a foot treadle, thus freeing up both hands to control drafting. This wheel was also much more productive; while the Great Wheel provided as much as a threefold increase over spinning on the rock, the Saxony Wheel provided twice that again [Munro 2003]. By the 1600s it was used extensively for both domestic and commercial spinning, and although like the Great Wheel it was initially banned by commercial wool producers on the grounds of quality control, these bans were soon lifted once its operation was fully understood.
While using a wheel is more productive, it is not particularly portable. A drop spindle can be tucked through a belt or into a pouch, and distaffs were typically held under one arm, enabling women to spin almost anywherein Figure 2 from the Lutterel Psalter (c. 1330), the farm wife has not bothered to put her distaff and spindle down while she is out in the yard feeding her poultry. In Figure 3, a woodcut of jugglers on the road from a broadside ballad c. 1450, not only is the wife balancing their entire household goods, plus the poultry and the baby, but she is spinning while they travel. And possibly patting the cat. It's rather hard to tell :-) (At least she gets to sit down!) While I feel there may be a certain amount of exaggeration in this picture, I am inclined to believe the spinning... So while a household might have had a spinning wheel, there would certainly still be several drop spindles around, and little girls would have learned to spin on the rock well before they began to use a wheel. (A Great Wheel looks quite dangerous to me, especially in an age where a compound fracture could kill. Note that in Figure 1 the woman is turning it with a stick; I wouldn't want to be reaching half-blindly for a set of fast-spinning spokes, or allow a young child anywhere near it!)
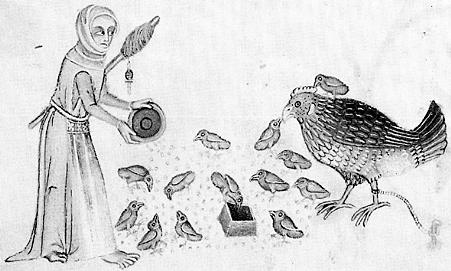
Figure 2. Woman with distaff feeding poultry c. 1330
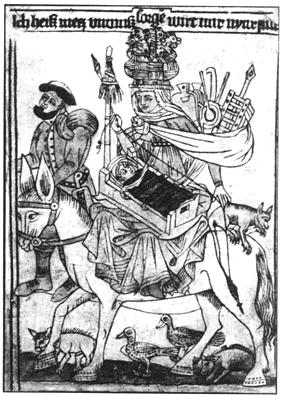
Figure 3. Jugglers on the road c. 1450
From ancient times spinning
has always been, and still predominantly is, the province of women.
Domestic textile production was part of women's work, and this continued even
once the great commercial drapery houses had become established by the twelfth
century. Although male weavers replaced female ones in the commercial
houses with the invention of the horizontal loom [Munro 2003], spinners were
still women. Wool was typically parceled out to women working at
home, or sometimes in a merchant's establishment, who were paid for piece-work
rather than receiving wages. So when you are sitting quietly and
contentedly spinning on the rock, think of and feel kinship for your millions of
sisters in spirit through the ages who have done exactly the same thing.
Figure 4 below shows pictures of five medieval spindles, ranging in time from the 1300s to the 1500s, left to right.
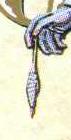
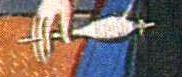
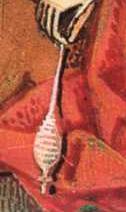
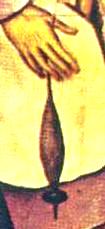
Figure 4. Medieval spindles from the 1300s to the 1500s
The women are all spinning with a distaff essentially the same as the one shown in Figure 3, and I believe the fibre they are spinning is flax, not wool. I cannot think of any way to bundle up wool so it has that conical haystack-like appearance, whereas unspun flax consists of quite coarse stands 30cm or more long, and would look exactly like that when tied at one end to the distaff. My guess is that the farm wife in Figure 2 is spinning wool; note the quite different configuration of the fibre on the distaffan egg-shaped mass bound in place with criss-crossed threads.
In the centre image above the woman appears to be winding thread onto the horizontally-held spindle, rather than actually spinning it, as quite a bit of thread is looped around the fingers of her right hand up near the distaff. The others are spinning.
The first thing to notice is that the thread is all wound into a, well, spindle-shape :-) The two leftmost spindles have no whorl visible. It is possible that the thread could be wound around the whorl, hiding it (possibly bead whorls), or else they really don't have whorls. In the three rightmost pictures, the thread is wound well above the whorl, leaving a short section of the spindle free just above it. This is quite unlike modern spinning practice, where the thread is wound into a cone with the base hard against the whorl. I am slowly getting the impression that spinning flax actually does depend as much on the finger-given twist as the spindle-given twist, in which case the lack of a spindle whorl would be less important. Having recently got some flax, I shall very soon try spinning it, and will report my findings here in due course.
The second interesting thing is that the three visible whorls are quite small; indeed, very small by modern standards. The rightmost spindle, which comes from a Breughel painting, has the largest whorl, nearly the size of that on a small modern wooden spindle. My guess is that at least the two smaller whorls are stone or cast lead; lead whorls are quite a common archaeological find. The Breughel one may be wood.
The third thing to note is the complete absence of a thread looped round the spindle end below the whorl and carrying back up to the top, as in modern technique (see Figure 5). In the middle picture, where the spinner is winding thread onto the spindle, this would of course not appear, but if it was a common practice it should be shown in the two rightmost pictures, both of which are superior paintings showing great, and highly accurate, detail. I think we can safely assume that if it had been common to loop the thread round the spindle under the whorl, Breughel would have observed and painted it. In modern spinning, the bottom loop provides tension on the thread so that the top half-hitch does not slip out of the notch and off the top of the spindle. In all the spinning miniatures I have looked at, the thread seems to just end at the top of the spindle; I think this is so because it is lying hard against the spindle, with the tension to hold it in place supplied by friction against the wound thread. If a tight turn were taken around the existing thread below the bulge before the thread was pulled up for the half-hitch around the top of the spindle, this would significantly aid it to stay in place.
The final thing to note is the absence of a notch near the top of the spindle. This is particularly obvious in the middle picture. Of course, it could be that every picture of a medieval spindle I've seen so far (about twenty) just happens to show the exact back of the spindle so that the notch is invisible, but somehow I feel this is straining coincidence a little far.
Figure 5 below shows a fully-dressed modern spindle and my conjecture for the dressing of a typical medieval spindle, both ready to spin.
I am going to explain how to spin on a typical modern spindle, for two reasons. Firstly, as yet I have not found any period descriptions of how to spin on the rock. This does not necessarily mean there are none, just that in the week or so of searching I've done, I haven't found any. Secondly, having tried my conjectural medieval spindle conformation, while it certainly works quite nicely for spinning, the modern spindle dressing is easier to work with, especially for a beginner. I am quite sure that the basic technique of drafting threads to be spun has not changed significantly since spinning was first invented. I am also only going to describe spinning wool, as I do not have enough experience with anything else yet. I have spun a little cotton (from a packet of cotton wool bought at a supermarket!), but nothing else. And yes, it is different from wool.
The next sections will cover fibres for spinning, initial dressing of the spindle, basic spinning technique, plying thread, winding a skein of wool, and setting the twist. Preparing wool for spinning will be covered in the final section.
First and foremost, wool, and second, flax (which produces linen). These were the fibres most commonly spun in our period. Hemp, stinging nettle fibres, and cotton were also spun. Ramie, from nettle fibres, is like a coarse linen and is very hard-wearing. Cotton was spun in steadily increasing amounts through the later half of our period, particularly in southern Europe, although I have the impression it was only spun for domestic consumption quite late in period. Finally, of all odd things, asbestos was also spun into thread and woven, although perhaps fortunately for the already-precarious health of the medieval woman, this was purely as a novelty and was scarcely common!
Camel hair was also spun in the Middle East, and used for clothing and tents. The poet Mutanabbi (905-965) wrote, in his Song of Maisuna:
The russet suit of camel's hair,
With spirits light, and eye serene,
Is dearer to my bosom far
Than all the trappings of a queen.
It is also possible to spin goat hair and angora rabbit, and while I'm pretty sure Angora bunnies were post-period, I'll bet there were European farm wives who gathered shed goat hair and spun it. Goat and yak were certainly spun in the Far East [Ryder 1993]. The hair of some modern breeds of dog can be spun, but I doubt this was done in period. Cat hair, although it will felt nicely, will not spin, as it lacks the proper surface scales.
Although it is actually possible to twist a bit of wool into a short thread with your fingers, wrap this around the notch at the top of a spindle, and start to spin (personal experience), it's not easy and success depends very much on the type of wool you are trying to spin. The normal way to dress a bare spindle is to take 30cm or so of spun thread, and begin by tying one end around the spindle just above the whorl with a granny knot. The thread is then pulled down over the edge of the whorl, wrapped around the bottom end of the spindle, and brought all the way back up to the top of the spindle to the notch. A half-hitch pulled tight around the spindle then secures the thread in the notch. (The half-hitch is made by looping the thread once around the spindle, then passing the free end back under the thread coming up from the whorl as though you were going to tie a simple knot, but without doing the second pass under the thread loop.) See Figure 6 for a diagram of this.
You now have a spindle with ten or so centimeters of thread free at the top, secured at the notch. The wool you will be about to spin will be in one of three forms: a teased mass, a rolag, or a combed staple. A teased mass is exactly what it sounds likea fluffy lump of wool which has been thoroughly pulled apart to separate the fibres, untangle them from dirt and burrs, and remove knots. A rolag is a cylinder of light, fluffy wool made by rolling carded wool off a carding comb (carder), a process described in the last section. A combed staple is a staple of woola lock of fibres which have all grown up closely together and are compressed together at the tipwhich has been gently brushed apart so that any shorter fibres have been removed and the strands all lie parallel to each other (see Making a Combed Staple).
The techniques for spinning
from a rolag and a teased mass are essentially the same. Spinning from a
combed staple is described later.
Hold the rolag or teased mass gently in your left hand. Take one end of the rolag (or pinch out a bit of the teased mass) between the thumb and forefinger of your right hand, and pull it out just a bit. Lay the end of the thread from the spindle in the middle of this pulled-out bit, overlapping one to two centimetres of the thread onto the wool. Hold this firmly in place at the top end of the thread with the thumb and forefinger of your left hand, and let go with your right hand. You now have the spindle dangling from your left hand, held by the thread.
Hold the top of the spindle between the thumb and first two fingers of your right hand, give it a good vigorous twist clockwise, and let go. The spindle and thread are now spinning.1 You will see the wool fibres start to twist around the thread where you are holding them in your left thumb and forefinger; as soon as they seem to have taken a good hold, pinch them firmly at this point with your right thumb and forefinger. Ease off on your left hand a bit and pull up gently with the left hand and down with your right hand so that a strand of fibres a few centimetres long is pulled out from the main mass/rolag. See Figure 7 for a diagram of this.
Pinch firmly at the top end of this strand with your left hand, then let go with your right hand. The twist which has been accumulating in the thread from the spindle's spin will run ziiiiip! up the strand and turn it into thread, firmly grabbing the original thread from the spindle as it goes. Pinch with your right hand just below your left hand, ease off with your left, draft out more fibres, and do it all again. That's all there is to it.
You need to be careful to keep the end of the drafted-out strand pinched firmly just below the end of the rolag or wool mass, so that you don't let the twist get up into the rest of the wool. It can be quite hard to untwist it if this happens, and you will suddenly find yourself spinning something more closely resembling a sausage than a nice thin thread!
As your spun thread lengthens, check that your spindle is still spinning, and still spinning clockwise. As the spin runs down there is an annoying tendency for the spindle to sneakily start spinning anticlockwise, undo the nice twist you've put in the thread, and cause it to suddenly fall apart. When you draft out a strand and let go with your right hand, if the twist does not immediately run up the strand this is a sign that your spindle has stopped spinning or is not spinning fast enough.
When the spindle reaches the
floor, let it fall on its side to stop the spin, gather up the thread by winding
it around your left hand a few times, unhook it from the notch and the bottom of
the spindle, and wind it onto the spindle just above the whorl.
Leave enough thread to wind around the bottom and up to the notch again, and
carry on.
1If the spindle will not spin quickly and evenly, you probably need more weight on the whorl. A lump of Blue-Tack around the spindle underneath the whorl should do the trick
You may have wondered why I specified spinning clockwise. Spinning the thread clockwise gives it what is known as a Z-twist, as opposed to the S-twist produced by anticlockwise spinning (see Figure 8). Due to the wool scales' configuration, a Z-twist produces a slightly stronger thread than an S-twist, although the S-twist is a little softer. Unless you are planning to weave and want your thread for the warp (lengthways threads) on the loom, it probably does not matter which way you twist, as long as you are consistent. When plying thead (see below), you take two or more threads of the same twist, and spin them in the opposite direction. This is part of what makes the plied yarn stay together (the other is setting the twist in hot water).
Your first thread will not be a miracle of evenness, to say the least. You will have thin bits and thickish lumps, which are called slubs and are actually considered desirable in novelty yarns for knitting! You will be surprised, however, at how quickly the evenness of your thread improves, and you will probably find that you are naturally spinning finer thread as well. Most thread spun on the rock was woven into cloth rather than plied for knitting, although knitting certainly existed in period (there are several lovely miniatures of knitting madonnas). If you wish to knit your spun wool, you can always ply several threads together (how to do this is described later); this will actually give a stronger and more even yarn than one thickly-spun thread.
You will also have the thread break quite a lot, and get very used to retrieving your spindle from the floor. I suggest you hold the spindle over your lap when you are joining the thread after it breaks, so that you don't have to chase the spindle across the floor if the join doesn't take first time. Overlap the thread by at least 3 or 4 cm when you are joining it.
Sometimes you will find that broken threads just will not rejoin, no matter how tightly you try to spin them. In this case, pinch off a little bit of wool from the other end of the rolag or the wool mass, and join that to the thread attached to the spindle. Spin this little fluffy bit of wool into thread, leaving some loose at the other end so you can join in the thread attached to the rolag/wool mass.
Unless you are spinning commercially carded wool, your wool will have burrs, grass seeds, chaff, dirt, and other assorted bits of muck (into the nature of which it is best not to enquire too closely) in it, even after carding. Pick off the obvious bits on the surface, and don't worry about the rest. They will stick out of the thread as it is spun, and you will be able to pick them off without too much trouble. While you are doing this, I suggest that you stop the spindle spinning (grab it between your feet or knees, or let it rest on the ground), so that it doesn't start to untwist while you are removing the bits from the thread. Incidentally, I recommend bare feet while you're spinning in the privacy of your own bowernot only is it easy to hold the spindle between your feet, but you can pick it up with your toes when it gets away, and save that undignified groping around on the floor :-)
There are two other things you may find in your wool: kemp and yolk.
Kemp is a small compact clump of very short fibres, often a somewhat different colour from the surrounding wool. Some breeds of sheep produce more of this than others; the sheep's follicles just seem to make a bunch of short fibres and shed them into the rest of the wool. Although it can probably be spun in with the rest of the fibres, it is a royal pain to try, so it is easiest just to pick the kemp lumps out when you find them. Also, if you are planning to dye the wool, kemp may come out a different colour [Dalby and Christmas 1984].
Yolk is a yellowish salt deposit on the fibres, which will mostly come off when you are carding the wool. If your wool has a lot of yolk, you'll have to give the left-hand carder a good thump, teeth side down, against your leg now and then to get rid of it. Apart from this, the only problem with yolk is that if the bottom ends of the fibres are badly yellowed by it, they may never come completely clean despite thorough washing, giving an uneven result if you dye the wool. Dalby and Christmas [1984] recommend choosing a fleece with little yolk for spinning.
When your spindle has a nice fat lot of thread wound on it, it's time to stop spinning and do something with it. Unhook the thread from the notch and the bottom of the spindle, and wind it into a ball. Don't forget to leave 30cm or so of thread on the spindle for starting your next lot of spinning. I suggest that you wind the thread around something like an old wooden cotton reel, or a short length of dowel, to give the ball a bit more weight. This will stop it jumping out of the cup and rolling round the table or onto the floor when you are plying the thread and getting near the end.
If the thread breaks while you are winding it into a ball, you can simply spin it back together. If you are going to ply the thread, however, you can just leave it and join it up when plying.
You will now have a nice ball of thread the size of a golf ball or a small orange, depending on how much you've spun. Put it in a coffee cup or one of Master Alex the Potter's lovely little pottery cups, and make another one.
 To
produce a plied yarn from thread, take two or more balls of thread which has all
been spun with the same twist. I will assume you have followed my
instructions and spun all your thread clockwise, with a Z-twist. Each of
your balls of thread should be sitting in a cup; this is to stop them
jumping about while they are being unrolled. Place the cups on a table
rather than the floor, so that you have a minimum of unplied thread extended.
This will help prevent the thread twisting up on itself excessively and tangling
(you cannot prevent some twisting up). Unroll half a metre or so of thread
from each ball and knot the ends of the threads together. Hook them around the
notch of an empty spindle. You may need to twist it a couple of times to
get it to stay in place.
To
produce a plied yarn from thread, take two or more balls of thread which has all
been spun with the same twist. I will assume you have followed my
instructions and spun all your thread clockwise, with a Z-twist. Each of
your balls of thread should be sitting in a cup; this is to stop them
jumping about while they are being unrolled. Place the cups on a table
rather than the floor, so that you have a minimum of unplied thread extended.
This will help prevent the thread twisting up on itself excessively and tangling
(you cannot prevent some twisting up). Unroll half a metre or so of thread
from each ball and knot the ends of the threads together. Hook them around the
notch of an empty spindle. You may need to twist it a couple of times to
get it to stay in place.
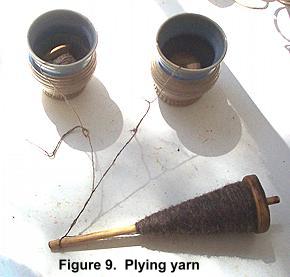
Now start the spindle spinning, but in an anticlockwise direction, ie, the yarn will have a S-twist. Slowly (so you don't break the thread) pull out more thread from the balls until your spindle is just off the floor. Give the spindle another vigorous twist and let it spin for a few seconds. Check that the twist is good enough (see below), wind up the yarn onto the spindle, dress the spindle as for ordinary spinning, and continue. Figure 9 shows a spindle full of plied wool and two of Master Alex's cups containing thread wound on wooden cotton reels.
How do you know if the twist is enough? Bend a section a few centimeters long near the top of your yarn into a U-shape. If the threads loosen or untwist at all, it needs more twist. It is fully plied when the yarn tries to twist itself together rather than staying in an open U. Plying takes quite a bit of twist. If it looks like too much twist, don't worryit will loosen up somewhat when you wash the yarn in hot water to set the twist.
Plying is much easier than spinning. It can almost get boring! Nothing bad happens if the spindle stops spinning and starts to untwist, you just have to start it spinning again. The only tricky part is if you need to join a broken thread. I recommend overlapping by at least 6-8 cm and plying it with the join quite close to the spindle, rather than way up the thread. You may need to spin in a thin wisp of unspun wool to make the overlapping threads sit tightly together.
If both threads break at the same point, however, untwist the spindle end and cut a good 20cm off one thread. Join one new thread on at this point, with a good overlap as above, and then do the second thread at the top of the joined section. If your overlap is not sufficient, the yarn may pull apart when you are winding it into a skein before washing it and setting the twist. At this point your only option will be to knot it, which is lumpy and unsatisfactory.
You now have a spindle full of plied wool, which needs to be wound into a skein so it will not tangle when it is washed or dyed. The oldest way of winding a skein was around a helper's hands, held upright, palms facing, about 50cm apart. This still works quite well, since neither yarn nor people have changed much since the Middle Ages :-) However, apart from one's relatives, there were two devices which were used for winding skeins in medieval times: a niddy-noddy and a warp wheel.
A niddy-noddy (see Figure 10) is essentially a pair of sticks set at right-angles to each other near the top and bottom of a vertical shaft of wood. The wool is wound from top front to bottom right to top back to bottom left and back up to top front. Why not just have a pair of pegs about a metre apart on piece of wood sitting on the table top? Because it would mean considerably more bending and stretching for the woman winding the skein, whereas with a niddy-noddy she could produce a nice long skein while keeping her arms essentially in front of her body. Having wound skeins on chair backs, I can assure you that even moving only 55 cm or so side to side becomes work quite quickly. Does this matter? I can spin enough wool for a 100-metre skein in two afternoons. Now do this for at least half your year, if you wish to clothe your family. Yes, it matters.
A warp wheel (see Figure 11) also has the advantage of needing minimal movement, probably even less than a niddy-noddy. As its name suggests, it is a wheel 50 or so cm in diameter set vertically on an upright post or on an axle between two posts, which sits on a table. The wheel may have a rim with pegs projecting horizontally from it on which the yarn is wound, or it may be rimless as in Figure 11, with crescent-shaped pieces at the end of the spokes to hold the yarn. The wheel in Figure 11 has a wooden tray at the bottom, presumably for holding wound skeins, spare spindles and so forth. (No date is given for Fig 11 in the source I took it from, but it looks early 1500s Flemish to me. The thread is probably linen.)
|
|
|
|
Figure 10. A niddy-noddy |
Figure 11. A skein wound on a warp wheel |
For modern purposes, a straight chair back or the legs of a stool will do nicely. If you measure the yarn path and count as you wind, you will know how much yarn you have. Set the spindle of yarn upright in a coffee cup on the floor, having unwound the yarn from the notch and spindle bottom, and start winding onto the chair back. Try to keep the skein from getting too tightyou don't need to have it under tension, just enough to stop it slipping down. If you have the spindle at the right angle in the cup, the yarn will simply unspool without needing to rotate the spindle at all (another advantage of the modern technique of winding the thread onto the spindle in a cone, rather than the medieval lens-shape).
When the yarn is all wound, you need to tie the skein in at least four places to prevent it tangling. Use a figure-8 tie as shown in Figure 12 below; this helps keep the strands separate [Dalby and Christmas, 1974].
Figure 12. Tying the skein
Fill a sink with enough very hot water to cover your skeins, drop them in, and let them soak for a few minutes. The water should be as hot as you can keep your hands in. Add some soap or dishwashing detergent. After the skeins have soaked, swoosh them around gently to remove any remaining dirt. This will also remove most of the lanolin; if you want greasy wool (eg, for waterproofing), omit the soap. Rinse the skeins in hot water until they are clean. Do not wring, scrub, or twist the skeins while washing themyou don't want the wool to felt. Just squeeze the water out gently. Hang the skeins in a breezy place out of the sun, and weight them lightly at the bottom to stop them kinking up. I hook a garden gate hinge or shot-bolt onto the bottom of the skein as the weight.
The soaking in hot water will have set the twist into the ply of the yarn, so that it will not easily unravel when loose. Once the skein is dry, remove the weights and ties and roll it into a ball. If you intend to dye it, leave it as a skein and don't remove the ties (in this case you must also have used soap when washing; greasy wool will not take dye well).
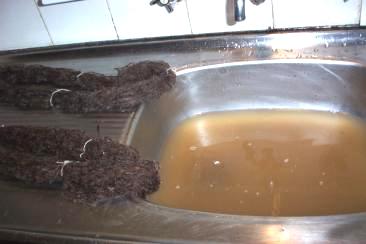
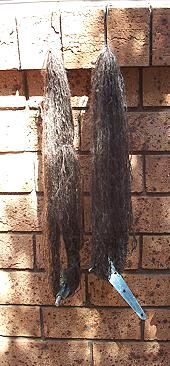
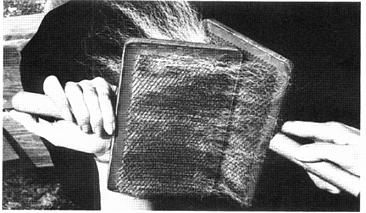
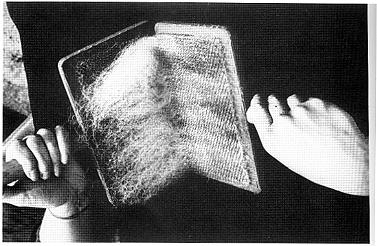
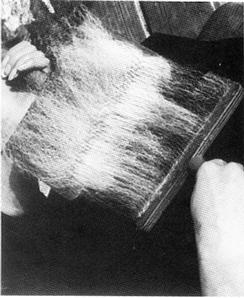
Figures 13 and 14 show how amazingly dirty my black wool was, even after vigorous brushing, and a couple of skeins hanging up to dry from wire hooks with my highly ersatz skein-weights.
|
Figure 13. First wash for two skeins, no soap |
Figure 14. Weighted skeins hanging to dry |
In this section we will take a quick look at what raw wool is like, and how it was prepared in period. Believe me, you wouldn't want to put a medieval wool comb anywhere near your head! We will also cover three ways of preparing wool for spinning: teasing, carding, and combing.
A fleece of raw wool has several different types of wool on it, ranging from easy to moderately difficult to spin. The best quality wool comes from the sheep's shoulders, head, and back; the worst, from the belly, legs, and rump. For beginners, a fleece with a longer staple (fibre length) is easier to spin than a short-staple fleece. Here in Australia we have predominantly merino sheep, with a short- to medium-length very fine staple which is extremely crinkly (crimped). This is only moderately like the wool from medieval sheep, which was, on average, not as fine or crimped. The Spanish merino sheep from which our modern ones were bred appeared quite late in our period, and their wool was not widespread until the 1500s. English wool was considered the highest quality and most desirable for luxury cloth until the 1500s or so, when its quality declined and Spanish merino moved into first place [Munro 2003].
In the Middle Ages there were laws passed in most of the great textile centres stating that a certain percentage of English wool must be used in cloth-making, with penalties for those drapers found to be using poorer-quality substitutes. The best luxury cloths ("scarlets") were produced from fine, short-staple wool prepared by combing rather than carding. (Combing removes the very short fibres, leaving a wool mass of even length and parallel fibres, while carding evenly combines fibres of all lengths.) The resulting fine cloth was then fulledfelted within an inch of its life, all loose fibres pulled up, and the resulting nap closely shorn off. This produced a smooth, fine, strong cloth showing no visible weaving pattern, which would not fray at the edges and would last several lifetimes. Such cloth was for the aristocratic market; for an example of the cost, to buy a single broadcloth of about 30 m x 2½ m would cost about 17 months' wages for a Flemish master mason or carpenter (the highest-paid skilled artisans) in the mid 1400s [Munro 2003]. A single weaving and fulling team could produce about 20 such cloths per year.
Longer-staple and coarser wool was made commercially into ordinary cloth ("stuff"), which was naturally much cheaper. And of course, wool cloth was produced domestically throughout our period for household consumption; its quality depended on the care and pasturage of the sheep and the skill of the women of the household.
A staple is a lock of fibres which have grown up as a single clump and are caught together at the tip (usually with dirt :-( ). Figure 15 shows two kinds of raw fleece and some individual staples, left pure merino (back or shoulder wool, I think) and right, a merino-Corriedale cross (belly wool on the left, shoulder wool on the right). The wool from the Corriedale cross is coarser and much longer-stapled, with less crimp. My guess is that good-quality medieval wool lay somewhere between these two, a bit closer to the merino. A close-up of a merino staple is shown in Figure 16; you can just see that there are about 5 crimps to the centimeter (12 per inch).
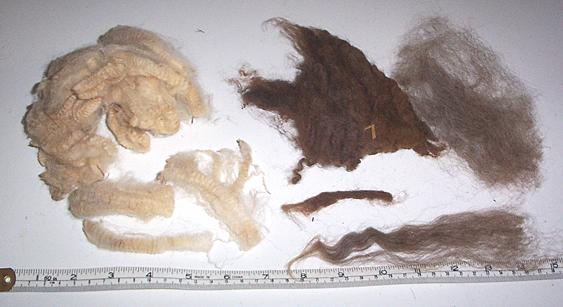
Figure 15 Merino (left) and merino-Corriedale cross raw wool.
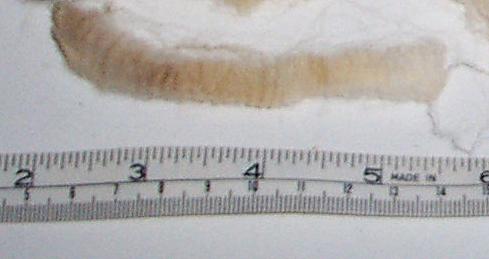
Fig 16. Close-up of merino staple showing crimping
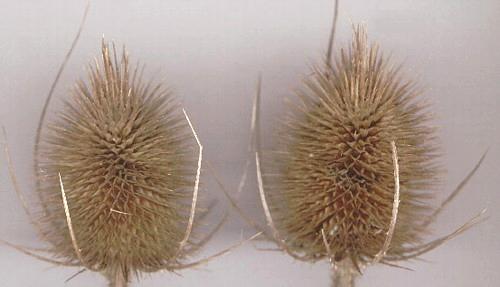
Medieval wool was prepared for spinning by first beating it thoroughly with willow sticks to loosen dirt and break the closely-clumped staples apart ("willeying"), and then combing or carding [Munro 2003]. If you were too poor to own tools, you used a dried teasel seed headteasel is a kind of thistleto card the wool (Figure 19), or simply teased the fibres apart in your fingers
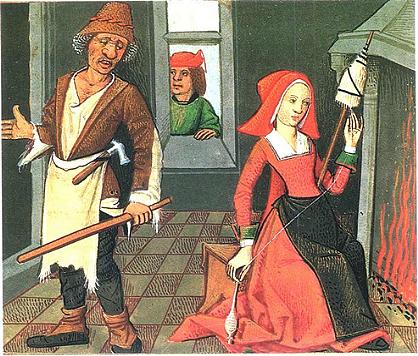
Wool combs had existed since ancient times, and were fearsome things. A pair of broomstick-sized sticks about 40cm long were joined in a T-shape, and the top of the T had a row of five to seven conical steel spikes 30-40 cm long, like an odd garden rake. Munro [2003] says that combs most typically had three rows of seven spikes rather than the single row shown in Figure 17, where a woman is holding one comb just above another mounted on a vertical post. As can be seen in Fig 17, the shorter fibres coiled up round the base of the spikes of the lower comb, leaving the longer fibres lying mostly parallel in the upper comb. I have no idea what is in the basket between the two combs lying on the ground.
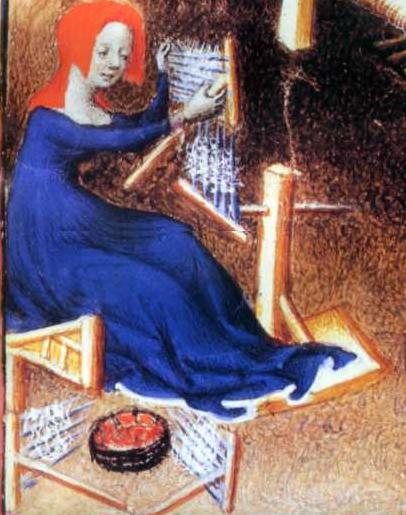
Figure 17. A 15th century woman combing wool for spinning
To the best of my knowledge, combs such as these are no longer used. Thank heavens!Thread spun from combed wool is known as worsted, named for the English town that was the centre of this type of thread production. It is smooth and strong, and was generally used for the warp fibres in weaving, which are under tension.
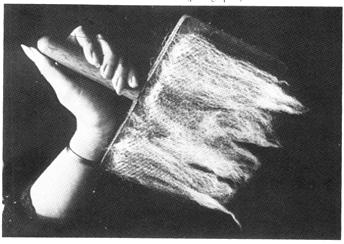
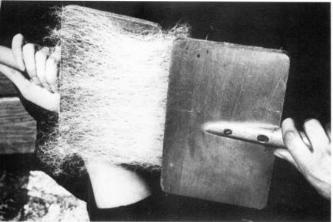
Carders were introduced from the Middle East towards the end of the 1200s, possibly earlier in Italy [Munro 2003]. A carder is a rectangle of wood about 25cm x 15cm with a handle in the middle of one long edge. The working surface often has a convex curve, and is covered in hundreds of little hooked spikes about 1cm long made by poking thin, stiff wire through a piece of leather. The wire is bent about half-way along, with the bent top pointing towards the handle side. Modern carders are almost exactly the same, except that some kind of synthetic cloth or vinyl holds the teeth rather than leather. Figure 18 from the Lutterel Psalter (c. 1330) shows a woman carding wool with a pair of carders, and three finished rolags lie on a plate next to her (or else she is going to have very long, skinny sausages for lunch).
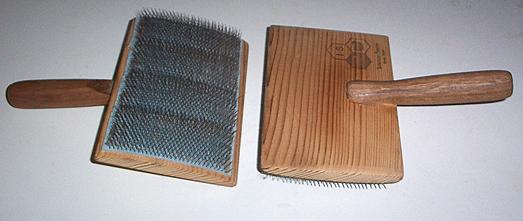
The term "carding" comes from the latin word for "thistle," carduus. Teasels (Dipsacus fullonum L.), a member of the thistle family, were the earliest carding tool and continued to be used, long after they had been commercially abandoned for general wool carding, to raise the nap on cloth during the complicated fulling process in commercial production. Dry teasel seed heads such as would have been used in medieval times are shown in Figure 19, and a pair of modern carders in Figure 20. Carders are used in pairs, with the wool being transferred from one carder to the other several times as they are drawn across each other, and finally rolled off the carder to form a rolag. The difference between carding and combing is that the shorter fibres are not removed by carding, but instead blended in among the longer ones. This results in woolen thread, fuzzier and slightly weaker than worsted. Woolen thread was commonly used as the weft (crossways thread) in medieval weaving [Munro 2003].
Carded wool was also banned for commercial luxury cloth production for many years on the grounds of thread quality, but Munro [2003] suggests it was more probably because carding made it so very easy to adulterate expensive high-quality wool with cheaper wool, since carding blends the fibres so evenly.
.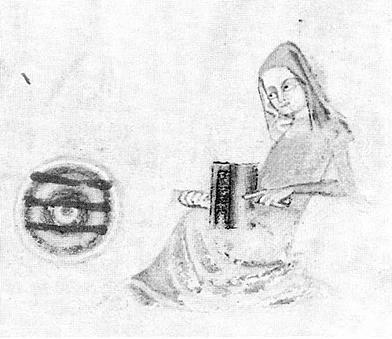
Figure 18. Carding wool into rolags, c.1330
Figure 19. Dry teasel seed heads
To tease wool, hold a couple of staples on your left hand, bottoms between your thumb and fourth finger, tops between your fore- and middle fingers. Pinch the edge of the outer staple with the thumb and forefinger of your right hand, near the top, and pull apart (see Figure 21). You will end up holding a fan of fibres in your left hand, and you can then separate the bottoms of the staples. You will need to tease several staples lightly before carding them into a rolag.
Figure 21. Teasing wool staples
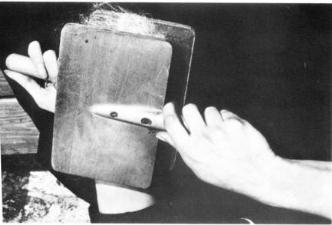
Figure 22 below gives step-by-step instructions in carding. The pictures are taken from Dalby and Christmas [1984]. Be very careful when you're first carding, as it is all too easy to rake your knuckles with the sharp teeth of the carder. I seriously suggest you stick a bandaid over the first knuckle of each hand when you begin cardingI gave myself a couple of very nasty scrapes before my skill improved.
Thread spun from a rolag of mixed short and long fibres produces woolen-type thread, similar to that used as the weft in medieval weaving.
|
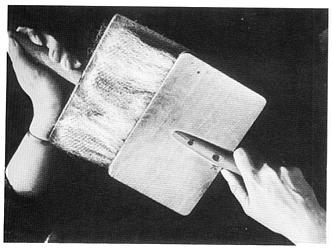
1. Hold one carder on your left thigh, teeth upwards. Place for or five lightly teased staples on it, cut ends to the left, tips to the right. Pat them down a bit. |
2. Place the left ("top") edge of the right carder near the top of the left carder, and draw the right carder to the right across the left one. Do this several times, moving the top of the right carder nearer to the bottom (handle side) of the left carder as you go. |
|
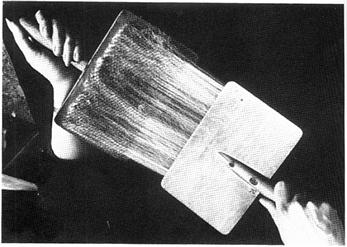
3. The fibres will be pulled out from the left carder and will transfer to the right carder. Lift the right carder upwards with a rocking motion as you pull it quite lightly across the left carder; this will help transfer them. |
4. If you cannot get all the fibres off the left carder, turn the right carder around so that it is almost at right-angles to the left one, with the top of the right near the bottom of the left, and pull it upwards across the left carder. |
|
5. All fibres are now on the right carder. Transfer them back to the left one by placing the top edge of the right carder near the bottom edge of the left one, laying the fringe of wool at the top of the left carder's teeth, and pushing the right carder slowly downwards across the left one. |
6. The fibres will transfer to the left carder; you may have topush the right carder quite sharply downwards at the last bit. |
|
7. Virtually all the wool is now sitting lighly on the left carder. |
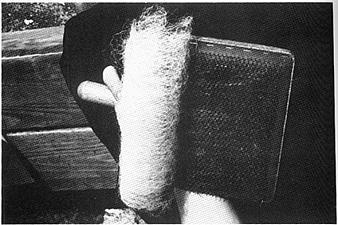
8. Lift up the fibres at the top edge of the left carder with the top edge of the right carder, and either continue rolling then up with the carder or your fingers. I find fingers easier.
|
|
9. The rolag is now completely rolled up and ready to take off. |
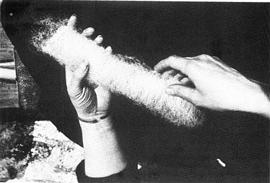
10. The finished rolag after gentle rolling across the left carder. |
Figure 22. Step-by-step carding instructions for making a rolag
When you've taken the rolag off the left carder, you may want to roll it very gently across the teeth to tuck the loose edge in. Rolags should be light and fluffy and full of air, so take care not to squash them.
Unfortunately, carders are not cheap; you'll be lucky to see change from $50 for a pair unless you can get them second-hand. If you don't have carders, you have two options: teasing or combing.
How to tease out fibres from staples is shown in Figure 21. For a teased mass of wool, you just pinch as small a clump as you can manage when you are pulling the fibres out, and once the staple is fully apart, keep pulling at it gently until you have separated as many strands as you can without starting to felt the wool. If your wool is very full of burrs and dirt, you may not be able to fully tease it successfully. In this case you will need to attack it vigorously with a hairbrush, which will give you some teased mass and some combed staples.
For making combed staples, I use an old hairbrush. Don't pick one of the kind that has lumps on the ends of the bristles. Tease the staple lightly without separating the bottom end, then hold this in one hand against your thigh and brush out the top end. When it is all nicely separated, hold the top end down and brush out the bottom end. You will end up with a rectangular lump of parallel fibres, with most of the shortest fibres stuck in the brush.
This will spin into a worsted-type thread, very smooth and strong. Worsted is similar to medieval thread for luxury cloth, and was (and still is) preferable for the warp threads in weaving.
To draft out fibres from a combed staple, fold it over the forefinger of your left hand and hold the ends between your thumb and your other fingers (see Figure 23). Draft the fibres out from the edge of the middle of the staple where is lies over your forefinger, and you will get a nice smooth strand. If you try to draft from the ends of the staple, they will clump up and tangle. This is known as the "folded lock" technique [Dalby and Christmas, 1984].
Dalby, Gill & Christmas, Liz. Spinning & Dyeing, An Introductory Manual. 0-7153-8515-1. David and Charles Inc., London, 1984
Hower, Virginia G. Weaving, Spinning, & Dyeing, A Beginner's Manual. ISBN 0-13-947804-3. Prentice-Hall Inc, Englewood Cliffs, New Jersey, 1976.
Munro, John. Medieval Woollens: Textiles, Textile Technology, and Industrial Organisation, c. 800 - 1500, in David Jenkins, ed., The Cambridge History of Western Textiles, 2 vols. (Cambridge and New York: Cambridge University Press, 2003), Vol. I, chapter 4, pp. 181-227.
Munro, John. Medieval Woollens: The Western European Woollen Industries and their Struggles for International Markets, c.1000 - 1500, in David Jenkins, ed., The Cambridge History of Western Textiles, 2 vols. (Cambridge and New York: Cambridge University Press, 2003), Vol. I, chapter 5, pp. 228-324, 378-86 (bibliography).
Ryder, M. L. 'The use of goat hair: an introductory historical review', Anthropozoologica 17 (1993), pp. 37-46.
Ryder, M. L'Coats of Himalayan Ruminants Elucidated by Study of a "Yeti" Skin', The Linnean 9 (1993), pp. 21-6.